ဘေလာ့မွာ Zawgyi ႏွင့္ Unicode ႏွစ္မ်ိဳးလံုးနဲ႔ဖတ္လို႔ရေအာင္
ရပါတယ္ screen shoot ေလးပါ တင္ေပးထားပါတယ္ မိမိ ရဲ့ ဘေလာမွာ ထည့္ထားခ်င္ရင္ေတာ့ ေအာက္မွာ ေျပာျပထားတဲ့အတိုင္း လုပ္လိုပ္ပါ စလိုက္ၾကရေအာင္....

<script type="text/javascript" src="http://yourjavascript.com/1010245324/unicodeorzawgyi_ayelwin.js"></script>
မိမိဘေလာ့မွာ notice infomation box ေလးထည့္မယ္
္ ဒီေကာင္ေလးမွာေတာ့ ကိုသြားေရာက္လည္ပတ္ေစခ်င္တဲ့ link ေလးပါထည့္ေပးလို႔ ရသလို imfomation သီးသန္႔ထည့္ခ်င္ရင္လဲ
ရပါတယ္ က်ေနာ့္ ဘေလာ့ေလးရဲ့ ညာဘက္ေအာက္ေထာင့္ေလးမွာ <button>DEMO</button> အေနနဲ႔ ၾကည့္ႏိုင္ပါတယ္။
ၾကိဳက္တယ္ဆိုရင္ေတာ့ စမ္းၾကည့္ လို႔ ရေအာင္ က်ေနာ္နားလည္သေလာက္ ရွင္းျပပါမယ္....က်ေနာ္လုပ္တာေတာ့ အဆင္ေျပပါတယ္။
သူငယ္ခ်င္းမ်ားအေနနဲ႔ အဆင္မေျပခဲ့ရင္ comment ေလးေရးထားခဲ့ပါ ....အဆင္ေျပရင္တယ္ ၾကိဳက္တယ္ဆိုရင္ေတာ့ ေက်းဇူးတင္
စကားေလးေျပာေပးသြားပါလို႔ ေျပာရေစ သူငယ္ခ်င္းတို႔ရဲ့ comments ေလးေတြက က်ေနာ့္အတြက္ အားေဆးမို႔ပါ..........:D။
စလိုက္ၾကရေအာင္ေနာ္........
၁။ ပထမဆံုး Dashboard –> Design tab –>Edit html –> ကိုသြားလိုက္ပါ။
၂။ expand webget ကို အမွတ္လးေပးလိုက္ပါ။
၃။ မိမိရဲ့ template ကို Download Full Template နဲ႔ download လုပ္ထားလိုက္ပါ.. မိမိ အမွတ္ရမယ့္ တစ္ေနရာမွာ သိမ္းထားလိုက္ပါ။ ဒီလိုလုပ္ရတာက မိမိဘေလာ့ေလးမွာ တစ္ခုခု မွားသြားခဲ့ရင္ မဂိုမူလ
အတိုင္း ျပန္ယူလို႔ ရေအာင္ ၾကိဳတင္သိမ္းထားျခင္းျဖစ္ပါတယ္။ ဒီအဆင့္ထိျပီးသြားဆိုရင္ ဆက္မယ္ေနာ္
၄။ ေအာက္မွာေပးထားတဲ့ ကုဒ္ေလးကို ရွာလိုက္ပါ။(ရွာရန္... ::.help???.::= ကီးဘုတ္မွ Ctrl+F ႏႈိက္လိုက္ပါ ကြန္ပ်ဴတာရဲ့
ေအာက္ေျခမွာ bar ေလးတစ္ခု တတ္လာမွာပါ အဲမွာ လက္၀ဲဘက္ေထာင့္မွာ စာရုိက္ထည့္လို႔ ရတဲ့ ေနရာေလးရွိပါတယ္
အဲဒီေနရာမွာ ေအာက္က ကုဒ္ေလးကို copy ယူျပီး ေပၚလာတဲ့ bar ေလးရဲ့စာရိုက္တဲ့ေနရာမွာ paste လုပ္လိုက္ပါ။)
(စာၾကြင္း။ ။ အခုလိုေျပာရတာ ဘေလာ့စတင္လုပ္သူေတြပါ အဆင္ေျပေအာင္လို႔ပါ ....bolg ႏွင့္ရင္ႏွီးပီးသားသူငယ္ခ်င္းအတြက္မရည္ရြယ္ပါ)
</head>
<script src="http://ajax.googleapis.com/ajax/libs/jquery/1.4.2/jquery.min.js" type="text/javascript"></script>
<script src="http://tntechie.googlecode.com/files/jquery.slidenote.min.js" type="text/javascript"></script>
]]></b:skin>
၇။ ]]></b:skin> ကိုရွာလို႔ေတြျပီဆိုရင္ ေအာက္က ကုဒ္ေလးကို အေပၚမွာ ထည့္လိုက္ပါ။ center>
/* ----- tntechie CSS START------ */၈။ ကိုယ္လိုခ်င္တဲ့ အက်ယ္ width: 540px ။အျမင့္ height: 140px ။ေနာက္ခံအေရာင္ background: #FBEC78 ေတြကို
.slidenote { width: 540px; height: 140px; background: #FBEC78; padding: 1em;
-moz-box-shadow: -0.2em -0.2em 0.7em #333; -webkit-box-shadow: -0.2em -0.2em 0.7em #333;}
.slidenote img { float: left; margin-left: -2em; margin-top: -2em; }
.slidenote img:hover { margin-top: -1.95em; }
/* ----- tntechie CSS END------ */
ျပန္ျပင္ႏိုင္ပါတယ္ ( { width: 540px; height: 140px; background: #FBEC78;) ။
၉။ ေနာက္ဆံုးအဆင့္အေနနဲ႔ ေအာက္မွာေပးထားတဲ့ ကုဒ္ေလးကို ရွာပါ။
</body>
<!-- Notification Slider Start -->၁၀။ မိမိရဲ့ template ကိုpreview နဲ႔ ၾကည့္လိုက္ပါ error မတတ္ရင္ေတာ့ save လုပ္လိုက္ပါ။
<div class='slidenote' id='note'>
<div id='container'>
<h2>ဒီေနရာမွာ ေခါင္စဥ္ေရးပါ</h2>
<span><em>ဒီေနရာမွာ မိမိေရးလိုတဲ့ infomarions ေတြေရးပါ</em></span>
<p><a href='ဒီေနရာမွာ infomations ရဲ့ link ကိုထည့္ပါ' target="_blank">သြားလည္မယ္</a> </p></div>
</div>
<script type='text/javascript'>
$('#note').slideNote({
closeImage: 'https://blogger.googleusercontent.com/img/b/R29vZ2xl/AVvXsEiyRA5mvTWRGQnakI50egwBlZjqwIJvWGNgn8sBgFQGvv3LnMKedtigKCwp9mWrRhCVf7zF4IVf4O9wMlfe3q86VWoTuaIDdo2q21c5icGfvqKUR5P5EIgKHVgGUImWF9Vm0d3k9Xhu3Coh/s1600/slidenote.close.png'
});
</script>
<!-- Notification Slider Ends -->
လုပ္ေဆာင္ခ်က္ ျပီးဆံုးသြားပါျပီ............အဆင္ေျပပါေစ.......Good luck!!!
၁၂။ မွတ္ခ်က္။ ။ မိမိေရးလိုတဲ့ infomations ေတြကို link မခ်ိတ္ ခ်င္ရင္ေတာ့
<p><a href='ဒီေနရာမွာ infomations ရဲ့ link ကိုထည့္ပါ' target="_blank">သြားလည္မယ္</a></p>
ဆိုတဲ့ စာေၾကာင္းေလးကို ျဖဳတ္လိုက္ပါ

နည္းပညာ ဆိုဒ္ေလးကို ဖိတ္ေခၚျခင္း
ဘေလာ့ဂါ post မွာ စာပိုဒ္ေလးေတြ ေဖ်ာက္ျပီးေရးနည္း
ေအာက္မွာ DEMO အေနနဲ႔ ေရးျပထားပါတယ္ ခင္ဗ်ာ အနီေရာင္စာေလးကို ႏႈိက္ၾကည့္လိုက္ပါ
ဒီေနရာကိုႏႈိက္၍ၾကည့္ပါ
က်ေနာ့္ ဘေလာ့ေလးမွာ အမွားေပါင္းမ်ားစြာနဲ႔ ျပည့္နက္ေနပါလိမ့္မယ္
က်ေနာ္ ေလ့လာေနေသာ
သိထားေသာ(တတ္ေျမာက္ကၽြမ္းက်င္ျခင္းမဟုတ္ပါ)
အေၾကာင္းအရာေလးေတြကို ျပန္လည္မွ်ေ၀ျခင္းသာျဖစ္ပါသည္
ဘေလာ့ေလး ကိုအလည္ေရာက္လာၾကသူ သူငယ္ခ်င္းမ်ား အေနနဲ႔
နားလည္ေပးၾကလိမ့္မယ္ ေမွ်ာ္လင့္ ရင္း
ေလးေတြ တင္ေပးလိုက္ပါတယ္ က်ေနာ္ကေတာ့ လွ်ိဳ႕၀ွက္ရတာ ၀ါသနာပါလို႔ :) က်ေနာ့္လို ၀ါသနာတူသူမ်ားလဲ အသံုးျပဳလို႔ရေအာင္
ျပန္လည္ မွ်ေ၀ေပးလိုက္ပါတယ္
<div style="background-color: #a0ffff; border: 0px solid 00000; color: black; font-family: arial; font-size: 12px; height: 40px; overflow: auto; padding: 4px; text-align: left; width: 395px;">
<div dir="ltr" style="text-align: left;" trbidi="on">
<div dir="ltr" style="text-align: left;" trbidi="on">
<script type="text/javascript">
var haut_max, timer_glisse, action_glisse, haut_fenetre = "";function deplie(blid) { var elm = document.getElementById(blid); if (parseInt(elm.style.height) == 0 || !elm.style.height) { elm.style.height = "auto"; elm.style.lineHeight = "120%"; init_glisse(blid, 'ouvre'); } else if (action_glisse == "") { init_glisse(blid, "ferme"); }}function init_glisse(blid, sens) { var elm = document.getElementById(blid); haut_max = (document.getElementById(blid).offsetHeight) ? document.getElementById(blid).offsetHeight : document.getElementById(blid).style.pixelHeight; if (sens == "ouvre") elm.style.height = "0px"; haut_fenetre = (document.body) ? document.body.clientHeight : window.innerHeight; clearTimeout(timer_glisse); timer_glisse = setTimeout("glisse('" + blid + "', '" + sens + "')", 10);}function glisse(blid, sens) { action_glisse = 1; var elm = document.getElementById(blid); var haut = parseInt(elm.style.height); if (sens == "ouvre") { haut = haut + 10; if (haut > haut_max) haut = haut_max; } else { haut = haut - 10; if (haut < 0) haut = 0; } elm.style.height = haut + "px"; if (sens == "ouvre") { if (haut < haut_max) { timer_glisse = setTimeout("glisse('" + blid + "', '" + sens + "')", 10); } else { action_glisse = ""; } } else { if (haut > 0) { timer_glisse = setTimeout("glisse('" + blid + "', '" + sens + "')", 10); } else { action_glisse = ""; elm.style.lineHeight = "0"; } }}
</script>
<h4 onclick="javascript:deplie('div1')"><blink>
ဒီေနရာကိုႏႈိက္၍ၾကည့္ပါ</blink></h4>
<div id="div1" style="height: 0px; line-height: 0px; overflow: hidden;">
<div style="background-color: #a0ffff; border: 0px solid 00000; color: black; font-family: arial; font-size: 14px; height: 60px; overflow: auto; padding: 4px; text-align: left; width: 420px;">
ဒီေနရာမွာမိမိ ၀ွက္ထားခ်င္တဲ့ စာေလးကိုေရးပါ</div></div>
ဘေလာ့ဂါ မွာ color code Generator ထည့္ခ်င္ရင္
ရယူႏိုင္တာေပါ့ ဟုတ္ဘူးလား :P
အေပၚမွာ ေပးထားတဲ့ ကုဒ္ေလးကို မိမိ ဘေလာ့ ရဲ႕ ကိုယ္ၾကိဳက္တဲ့ တစ္ေနရာရာမွာ ထည့္ထားလိုေပါ့ ။<center><object2 border="1" classid="clsid:D27CDB6E-AE6D-11CF-96B8-444553540000" codebase="http://download.macromedia.com/pub/shockwave/cabs/flash/swflash.cab#version=6,0,40,0" height="480" id="obj1" width="480"><embed height="485" name="obj2" pluginspage="http://www.macromedia.com/go/getflashplayer" quality="High" src="http://www.2createawebsite.com/build/col.swf" type="application/x-shockwave-flash" width="485"></embed></object2></center>
မွတ္ခ်က္။ ။ ထည့္တဲ့အခါမွာ HTML အေနနဲ႔ ထည့္ပါ post မွာ ဆိုရင္ Edit HTML ကိုေရြးျပီးထည့္ပါ။Gadget ေနရာမွာဆိုရင္ေတာ့
HTML/Javascript မွာ ထည့္ေပးပါ။
ျပန္ျပင္ရန္။ ။ အနီေရာင္ေလးနဲ႔ ေရးထားတဲ့ အျမင့္နဲ႔ အက်ယ္ ကိုေတာ့ ကိုယ္လိုအပ္သလိုျပန္ျပင္ႏိုင္ပါတယ္
height="485" / width="485" Scorce: http://www.itechcolumn.com/2012/03/how-to-add-color-code-wheel-to-blogger.html
မိမိရဲ႕ post မွာ ပံုေလးေတြကို scrolling နဲ႔ တင္နည္း
DEMO
<marquee behavior="scroll" direction="right">
<img src="ဒီေနရာမွာ ပံုရဲ႕ URL ကိုထည့္ပါ" width="200" height="200" alt="Art design" />
<p>An image by<p><a href="http://ayelwin-it.blogspot.com/">ေမာင္ေအးလြင္| it ႏွင့္ ဘေလာ့ နည္းပညာ(ျပန္လည္မွ်ေ၀ျခင္း</a>
</marquee>
အဖိုးတန္ ေဆာ့၀ဲလ္မ်ား

Antamedia HotSpot Billing Software is Windows PC gateway software which enables control and charging for Internet access using captive portal technology. The software is suitable for all purposes where customers should get fast login to system without installation of client software. After connecting to the network (using wireless cards or UTP cable), the customer will be prompted to type username and password to gain access to the Internet. Customers will see the time and bandwidth usage and will be able to fill their time when needed. For those who already request this software, I can only give this version.
Antamedia Internet caffé 5.40
Full (Max 250 clients)

Internet Cafe Software, Cyber Cafe Software and Gaming Center Software by Antamedia, controls time and bandwidth usage of your computers and game consoles. You can easily manage customer accounts, setup security, charge POS items and get latest statistics, logs and detailed reports. Internet Caffe is easy, powerful and reliable and it will help you to improve your business and increase your cyber cafe revenue.
Antamedia Bandwidth Manager

Antamedia Bandwidth Manager software controls download and upload rates for every computer in your network, using a shared Internet connection (NAT), meaning it acts as a gateway to the Internet. You no longer need to install software on each computer to control bandwidth quotas, set time limits and priorities for different users, configure firewalls and other advanced features, such as blocking unauthorized websites.
Bandwidth Manager also gives you real control over what can be accessed, making it ideal for schools or preventing illegal or dangerous downloads.
Antamedia bandwidth management software is perfect for Internet and game cafes as it tightly integrates with any available CyberCafe management software. If used with Antamedia's specialist Internet Cafe, operation is fully automated and extra easy. You can set maximum download and upload rates for your customers, with each computer connection auto-disabled at session end.
Computers can be limited with specified time and quota per session, day time when access is allowed and set to logout after inactivity. Software enables control and billing using captive portal technology and it's suitable for ISPs, Hotspots, Airports, Hotels, Internet and Cyber cafes.
This fully functional and obligation-free trial period download means you can assess Antamedia Bandwidth Manager today, without any risks or major reconfiguring of your network. Try it right now and discover why Antamedia has become the world's favorite for resource management software solutions.
Anti Deep Freeze Collections 2012

If you modify system files or download new software via a computer that Deep Freeze is installed applications, then these activities will automatically be canceled after the computer restarts.
So let's say you go to a cyber cafe (figuring) and download some files and computers used to use Deep Freeze, then after the computer is turned off and turned on again, your files will be deleted automatically and the computer will return to its original condition as when first you turn it on.
Take it easy ... here I will share a small utility called Anti-Deep-Freeze, in which this tool can automatically stop the process of Deep Freeze is active and will help you to download anything again without any worries.
Bandwidth Monitor 3.4
 Bandwidth Monitor monitors bandwidth usages through computer it's installed on. The software displays real-time download and upload speeds in graphical and numerical forms (refer to screen shot below), logs bandwidth usages, and provides daily, weekly, monthly, and summary bandwidth usage reports.
Bandwidth Monitor Pro v1.30
 Bandwidth Monitor Pro is a utility that displays and logs your network adapters bandwidth usage.
 It supports logging of all your network adapters at once and has a detailed transfer history. Included is an advanced alert system where you can set up rules to execute various actions like send e-mail, play sounds, execute files, shutdown, etc. when certain conditions are meet. You can let Bandwidth Monitor Pro run in the background and it will log all your incoming and outgoing traffic for you to view later in the transfer log, or in real time if you wish.
Bandwidth Controller Enterprise |
The product can be installed on any internet gateway or server computer giving network administrators access to all internet streams for both upload and download directions. By using this architecture, bandwidth rules and product configuration are guarded against modification from end-users, with the additional benefit of transparent operation (i.e. client-side installation is not required).
Kernel level processing provides extra performance for high speed networks, with support for line speeds up to 8,000 Mbps. Real-time traffic such as VoIP and video is handled by the kernel processor using a combination of prioritization (QoS) and guaranteed service levels (SLAs), resulting in high quality network streams.
Billing Explorer DeskPro8
 ExpolerBilling Billing Billing Explorer has spent figuring / Game Center their latest version. Billing Explorer DeskPro8 ie the same as the previous version F11, F11 DeskPro8 Billing Explorer can run stable at the Operating System Win'95 / 98/Me/2000/NT/XP. Also BillingExplorer Protocol Support TCP / IP and Net-NetBEUI, DHCP Support and Fix-IP Address.
According to Billing Explorer, their latest software DeskPro8 Billing Explorer has been tested and used in most cafes and online gaming, keep your PC stable and not easy to hang / crash. Where in previous versions, especially for Billing Billing Explorer Explorer Crack or pirated, data revenues / receipts can be erased and manipulated, even the administrator password can be known.
And highly recommended for users Billing explorer to immediately upgrade to the latest version, to cover the bugs in earlier versions. Upgrades are made very easy, you just Download Billingexplorer.exe and overwrite the old billingexplorer.
Can Control All Volume / Sound PC Client. Can Billing server Small Large Volume Set Each PC Client, Disable / Enable Messages Client to Client or Client to Server, More Security, Full Anti Ctrl + Alt + Del, Task Manager Protection, Blocking Controller, Auto Shutdown, Client Settings From Server etc..
DeskPro8 F12 2010:
Such facilities could DeskPro7 All Volume Control / Sound PC Client with the addition of the following:
-USB Lock & Unlock
USB Lock Menvegah Virus Log of USB.USB Unlock to open the USB back
-Point System
With the Point System, Owner Warnet & Bonus Game Online can give to the Member or User's Internet Game in place.
For example in Warnet ABCDE:
Users who use the Internet, at least 1 hour, will get the point = 1.
If 10 hours, got a point = 10 ff.
These points can be collected as much as possible. Owner Warnet Bonus Game will give, for example as follows:
Number of Points = 4, can be exchanged for soft drinks.
Number of Points = 5, can be exchanged with the bag.
Number of Points = 8, can be exchanged with HP Voucher.
And so on, so owners can define their own Warnet Game Point Rewardnya.
Voucher System Time and Money
With this system, owners can distinguish Warnet & Game Rates for Her computer type.
For example in Warnet ABCDE:
PC No. 1 to 30, Cost per hour = 2000 Games, but to direct Package 5 Hours bianya = rp. 7500, -
PC No. 31 to 50, Cost per hour = 2500 Games, but to direct Package 5 Hours bianya = rp. 10.000, -
The owner can sell Warnet Game Value Voucher with 10,000, - and 7,500, - for Package 5 Hours.
Distribution Rates Could Cost Per Type of Group Computer In 1 Room Can Regulated Rates as follows:
(Personal, Group, Games, Prepaid, Voucher, etc.)
For example: 1 Rooms There are 30 PC Client
Client No. 1 s / d 10 Use Type quadcore PC, equipped with a WebCam, and Ada his AC.
Internet Rates rp. 3500/Jam, Game rp. 3200/Jam, Member rp. 3000/Jam
Client No. 11 s / d 20 Using PC Core2Core type, equipped with a WebCam.
Internet Rates rp. 3300/Jam, Game rp. 3100/Jam, Member rp. 2800/Jam
Client No. 21 s / d 30 Using PC type Pentium 3, Without a WebCam, and his No air conditioning.
Internet Rates rp. 3000/Jam, Game rp. 2900/Jam, Member rp. 2700/Jam
With DeskPro8, a room can be arranged VIP Distribution Charge Rates, Economy Rates, Etc. Standard Tariff.
In Version DeskPro8:
An account can be different Member Cost Rates, In the above example, If the Member page. using the PC between the No. 1 s / d 10, the fee was rp. 3000/Jam.Jika wear No. 11 PC s / d 20, using the PC Charge 2800/Jam.Jika No. 21 s / d 30, fares 2700/Jam.
Report To do List (Admin, Operator, etc.)
Billing Activity Report carried out by Admin, Operator, Owner, Like Now go to Menu Member Area, Configuration Settings, Setting Fees, User Management, Billing etc. Close.
User Account Management
Registering or Edit Account that is used to Access Billing, Adding Like List Group Super Admin, Group Admin or regular User Group.
ကျန်တဲ့ဆော့ဝဲလ်တွေတော့တခုချင်းဆီမရှင်းပြတော့ပါဘူး။အောက်ပါဆော့ဝဲလ်များစွာကျန်ပါသေးတယ်


ျမန္မာအိုင္တီ မွာ Admin ကိုခ်စ္ ၾကီး (က်ေနာ္ အရမ္း အားကိုး အားက် ရတဲ့ ခ်စ္ကိုၾကီးရဲ႕ post ေလးျဖစ္ပါတယ္ ေအာက္မွာ ေဒါင္းေလာ့ လင့္ေလးေတြ တင္ေပးထားပါတယ္
ပါ့စ၀က္ ကေတာ့ www.mmitd.combykochit ျဖစ္ပါတယ္ ဒီ post ေလးကို ၾကိဳက္တယ္ဆိုရင္ေတာ့
ဒီေနရာမွာ သြားျပီး ေက်းဇူးတင္ စကားေလးေျပာေပးၾကပါ လို႔ ေမတၱာ ရပ္ခံပါတယ္ခင္ဗ်ာ
ေဒါင္းေလာ့
http://www.kochit.mmitd.com/upload/Antamedia%20HotSpot%20v1.6.4%20p...
http://www.kochit.mmitd.com/upload/Antamedia%20Internet%20Caffe%205...
http://www.kochit.mmitd.com/upload/Antamedia.Bandwidth.Manager.1.0....
http://www.kochit.mmitd.com/upload/Anti%20Deep%20Freeze%20Collectio...
http://www.kochit.mmitd.com/upload/Bandwidth%20Monitor%20v3.4/Bandw...
http://www.kochit.mmitd.com/upload/Bandwidth.Monitor.Pro.v1.30.Crac...
http://www.kochit.mmitd.com/upload/BandwidthcontrollerEnterprise%20...
http://www.kochit.mmitd.com/upload/Billing%20Explorer%20DeskPro8%20...
http://www.kochit.mmitd.com/upload/Billing%20Internet%20eCafe%20Pro...
http://www.kochit.mmitd.com/upload/Billing-Explorer%20DeskPro%206.0...
http://www.kochit.mmitd.com/upload/Cafezee%203.9/Cafezee%203.9%20pr...
http://www.kochit.mmitd.com/upload/Cafezee_3.9/Cafezee_3.9%20presen...
http://www.kochit.mmitd.com/upload/CyberBilling%205.0v/CyberBilling...
http://www.kochit.mmitd.com/upload/CyberCafePro%206%20Full/CyberCaf...
http://www.kochit.mmitd.com/upload/Deep.Freeze.Standard.v6.62.020.3...
http://www.kochit.mmitd.com/upload/Deep.Freeze.Standard.v7.21.020.3...
http://www.kochit.mmitd.com/upload/Deep.Freeze.Standard.v7.21.020.3...
http://www.kochit.mmitd.com/upload/Deep.Freeze.enter.v7.30%20presen...
http://www.kochit.mmitd.com/upload/Faronics%20DFS%20v7.20.020.3398%...
http://www.kochit.mmitd.com/upload/Faronics%20Deep%20Freeze%20Enter...
http://www.kochit.mmitd.com/upload/Faronics_DFE%20730%20%20serial%2...
http://www.kochit.mmitd.com/upload/Hoo%20Technologies%20-%20Net%20M...
http://www.kochit.mmitd.com/upload/HotSpot%20Shield%202012.exe
http://www.kochit.mmitd.com/upload/IndoBilling%205.92%20Full/IndoBi...
http://www.kochit.mmitd.com/upload/Legal%20Billing%20v6.0.6.6/Legal...
http://www.kochit.mmitd.com/upload/Net%20Meter%20Pro%20v7.01/Get%20...
http://www.kochit.mmitd.com/upload/Proxy%20Pro%20Workstation%20Edit...
http://www.kochit.mmitd.com/upload/WizardSoft%20Net%20Meter%20Pro%2...
http://www.kochit.mmitd.com/upload/ultra.zip
မိမိရဲ့ Post တိုင္း မွာ ေနာက္ခံေျပာင္းျပီးေရးမယ္
- ဘေလာ့ဂါေပါက္စ(က်ေနာ္လိုေပါ့:P) အတြက္ မိမိ post တင္တိုင္း post ရဲ့ ေနာက္ခံ (background)ကို မိမိ ၾကိဳက္တဲ့ အေရာင္ ျပီးရင္ .....မိမိ ၾကိဳက္တဲ့ ေနာက္ခံပံုေလးေတြ အမ်ိဳးမ်ိဳးနဲ႔ေျပာင္းျပီး တင္ခ်င္ရင္ပဲျဖစ္ျဖစ္ ကိုယ္ထင္ထင္ရွာရွား ျပလို႔တဲ့ post ေတြပဲျဖစ္ျဖစ္ ေနာက္ခံအေရာင္(သို႕)ေနာက္ခံပံု အမ်ိဳးမ်ိဳး ေျပာင္းတင္လို႔ ရေအာင္ က်ေနာ္သိထားတဲ့ ကုဒ္ေလးေတြကို သူငယ္ခ်င္းမ်ားအတြက္ ျပန္လည္ မွ်ေ၀လိုက္ပါတယ္။ စေျပာေတာ့မယ္ေနာ္.........အရမ္းလြယ္ပါတယ္..ခိခိ
- Post အသစ္တင္ တင္မယ္(New Post)ဆိုတာကို ႏႈိက္လိုက္တာနဲ႔ Compose ႏွင့္ Edit HTMLေတြရမွာပါ....HTML ကိုေရြးလိုက္ပါ။
- ေအာက္မွာေပးထားတဲ့ ကုဒ္ေလးေတြကို အသံုးျပဳလိုက္ပါ ။ဒါကေတာ့ အေရာင္ေနာက္ခံအတြက္ ကုဒ္ေလးေတြပါ။ ဒါကေတာ့ အေရာင္ေနာက္ခံ ကုဒ္ေလးပါ။
- ဒီကုဒ္ေလးကေတာ့ ေနာက္ခံ ပံုထည့္မယ္ ကုဒ္ေလးပါ။ gif format ပါ support ပါတယ္။ ဒီ post မွာ ဥပမာအေနနဲ႔ တင္္လိုက္ပါတယ္။ေအာက္က ကုဒ္ေလးကို အသံုးျပဳထားပါတယ္.............။
<div style="background:ဒိေနရာမွာ အေရာင္ကုဒ္ကိုထည့္ပါ; padding:5px 10px 5px 10px;">ဒီေနရာမွာ မိမိ post ကိုေရးပါ </div>အေ၇ာင္ ကုဒ္ေလးေတြအတြက္ အဆင္မေျပသူမ်ား ေအာက္မွာ ကြန္႔မက္ေလးေပးသြားပါ.....။
<div style="background:url(ဒီေနရာမွာ ပံု ရဲ့ URL ကိုထည့္ပါ) no-repeat;"> ဒီေန၇ာမွာ Post ကို ေရးပါ </div>no-repeat ေနရာမွာ မိမိ ပံုႏွင့္ ကိုက္ညီမႈမရွိရင္ေတာ့ no-repeat မွာ no- ကိုျဖဳတ္ျပီး repeat လို႔ေျပာင္းႏိုင္ပါတယ္....။ ဥပမာ အေနနဲ႔ ေအာက္မွာ ၾကည့္ႏိုင္ပါတယ္.............။
<div style="background:url(ဒီေနရာမွာ ပံု ရဲ့ URL ကိုထည့္ပါ) repeat;"> ဒီေန၇ာမွာ Post ကို ေရးပါ </div>

Newer Posts, Older posts ႏွင့္ Home ေနရာမွာ ပံုနဲ႔ အစားထိုးနည္း
- www.blogger.com ကို blogger account နဲ႔ Login ၀င္လိုက္ပါ။
- Dashboard>Design> ကိုသြားလိုက္ပါ။
- Edit HTML ကိုေရြးပါ။Expand Widget Templates .....ေရွ႕မွာ အမွတ္ေပးပါ။
- Expand Widget Templates .....ေရွ႕မွာ အမွတ္ေပးပါ။
- ေအာက္မွာေပးထားတဲ့ ကုဒ္ေလးေတြမွာ အနီေရာင္စာသားေလးေတြပါတာကို စာတစ္ေၾကာင္းေလာက္ေရြးျပီး ရွာပါ.။
- အနီေရာင္နဲ႔ ေရးထားတဲ့ ကုဒ္ေနရာေလးေတြမွာ အစားထိုးေပးရပါမယ္။
<data:newerPageTitle/> နဲ႔ အစားထိုေပးပါ: <img alt='Newer Posts' src='ပံုရဲ႔URLထည့္'/>
<data:olderPageTitle/>နဲ႔ အစားထိုေပးပါ : <img alt='Older Posts' src='ပံုရဲ႔URLထည့္'/>
<data:homeMsg/> နဲ႔ အစားထိုေပးပါ: <img alt='Home' src='ပံုရဲ႔URLထည့္'/> - template ကို save လိုက္ပါ>>>>> ျပီးပါျပီ လွပေသသပ္ေသာ blog ေလးပိုင္ႏိုင္ၾကပါေစ။
<span id='blog-pager-newer-link'> <a class='blog-pager-newer-link' expr:href='data:newerPageUrl' expr:id='data:widget.instanceId + "_blog-pager-newer-link"' expr:title='data:newerPageTitle'><data:newerPageTitle/></a> </span> </b:if> <b:if cond='data:olderPageUrl'> <span id='blog-pager-older-link'> <a class='blog-pager-older-link' expr:href='data:olderPageUrl' expr:id='data:widget.instanceId + "_blog-pager-older-link"' expr:title='data:olderPageTitle'><data:olderPageTitle/></a> </span> </b:if> <b:if cond='data:blog.homepageUrl != data:blog.url'> <a class='home-link' expr:href='data:blog.homepageUrl'><data:homeMsg/></a> <b:else/> <b:if cond='data:newerPageUrl'> <a class='home-link' expr:href='data:blog.homepageUrl'><data:homeMsg/></a> </b:if> </b:if>

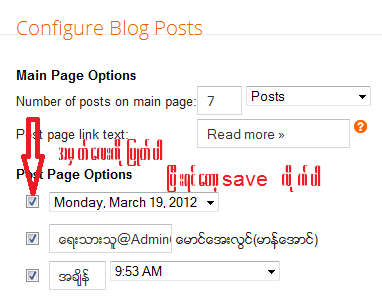
ဘေလာ့ဂါမွာ Post Date Header ကိုျဖဳတ္နည္း
post တင္တဲ့အခါမွာ မိမိတင္တဲ့ပို႔ေလးမွာ ေရးသားတဲ့ date ေလး ကိုျဖဳတ္ခ်င္ရင္ဒီနည္းေလးကိုသံုးလို႔ ၇ပါတယ္ ...ညီေလးတစ္ေယာက္ကေမးလို႔ က်ေနာ္လဲ ဟိုရွာဒီရွာနဲ႔ ေတြျပီး ကိုယ္တိုင္စမ္းၾကည့္တာ အဆင္ေျပလို႔ post ေလးအျဖစ္ က်ေနာ့္ မွတ္စုေလးမွာ တင္လိုက္ပါတယ္ မသိေသးတဲ့ သူငယ္ခ်င္းေတြလဲ
Post Date Header ေလးကို ျဖဳတ္ခ်င္ရင္ အသံုးျပဳလို႔ရေအာင္လို႔ပါ.
i. Blogger Dashboard ကိုအရင္၀င္လိုက္ပါ.
ii. Page Elements ကိုေရြးလိုက္ပါ
iii. blog post ကိုရွာပါ ေတြ႔ရင္ Etid ကိုႏိႈက္လိုက္ပါ...ေအာက္မွာ ပံုေလးနဲ႔ ျပသြားပါမယ္....
iv.

vi.

vii. Preview နဲ႔ၾကည့္လိုက္ပါ Save လိုက္လို႔ ရပါျပီ။အဲဒါမွ posting date မေပ်ာက္ေသးဘူးဆိုရင္
ေအာက္ကနည္းအတိုင္းဆင္လုပ္ပါ။
ဒါကေတာ့ ေနာက္တစ္နည္းပါ
Steps:
i. Blogger Dashboard ကို၀င္လိုက္ပါ။
ii. Edit HTML ကိုေရြးလိုက္ပါ။
iii. Expand Widget Templates မွာ အမွန္ျခစ္ေလးေပးပါ
iv. ]]></b:skin ဒီကုဒ္ေလးကိုရွာလိုက္ပါ
v. ]]></b:skin> ကိုေတြျပီဆိုရင္ ေအာက္မွာ ေပးထားတဲ့ ကုဒ္ကို ]]></b:skin> ရဲ႕အေပၚက ထည့္လိုပ္ပါ။
.date-header {display:none !important;}vi. Preview နဲ႔ အရင္ၾကည့္လိုပါ error မတတ္ဘူးဆိုရင္ေတာ့ template ကို Save လိုက္ပါ။
vii. မိမိရဲ႕ ဘေလာ့ေလးကို ၾကည့္လိုက္ပါ posting date ေတြကို ေဖ်ာက္ပီးသားေတြပါလိမ့္မယ္။
Enjoy :-)

ဘေလာ့ဂါ post မွာ Animated picture ထည့္မယ္


သူငယ္ခ်င္းေတြ အတြက္ တစ္ခါတစ္ေလ ကိုယ္ေရးတဲ့ post ေတြမွာ ဒီလိုပံု အရွင္ေလးေတြ ထည့္လို႔ ရေအာင္ ေရးသား ေပၚျပလိုက္ပါတယ္ ေအာက္မွာ ပံုထည့္ရမယ့္ ကုဒ္ေလးေတြကိုပါ

က်ေနာ္ေျပာခ်င္ေသာ စကားေလးပါ
ဒီေနရာကိုႏႈိက္၍ၾကည့္ပါ
က်ေနာ့္ ဘေလာ့ေလးမွာ အမွားေပါင္းမ်ားစြာနဲ႔ ျပည့္နက္ေနပါလိမ့္မယ္
က်ေနာ္ ေလ့လာေနေသာ သိထားေသာ(တတ္ေျမာက္ကၽြမ္းက်င္ျခင္းမဟုတ္ပါ)
အေၾကာင္းအရာေလးေတြကို ျပန္လည္မွ်ေ၀ျခင္းသာျဖစ္ပါသည္
ဘေလာ့ေလး ကိုအလည္ေရာက္လာၾကသူ သူငယ္ခ်င္းမ်ား အေနနဲ႔
နားလည္ေပးၾကလိမ့္မယ္ ေမွ်ာ္လင့္ ရင္း
က်ေနာ့္ ဘေလာ့ေလးမွာ အမွားေပါင္းမ်ားစြာနဲ႔ ျပည့္နက္ေနပါလိမ့္မယ္
က်ေနာ္ ေလ့လာေနေသာ သိထားေသာ(တတ္ေျမာက္ကၽြမ္းက်င္ျခင္းမဟုတ္ပါ)
အေၾကာင္းအရာေလးေတြကို ျပန္လည္မွ်ေ၀ျခင္းသာျဖစ္ပါသည္
ဘေလာ့ေလး ကိုအလည္ေရာက္လာၾကသူ သူငယ္ခ်င္းမ်ား အေနနဲ႔
နားလည္ေပးၾကလိမ့္မယ္ ေမွ်ာ္လင့္ ရင္း
***************************************************************************

ဘေလာ့ဂါ မွာ forum ေလးထည့္မယ္

မိမိ ဘေလာစပို႔စ္ ေလးမွာ ေဖာ္ရမ္ထည့္နည္းေလးပါ blogspot မွာ ေဖာ္ရမ္ေလးပါ သံုခ်င္တယ္ဆိုရင္ေတာ့ က်ေနာ္ ရွာေတြ႔ထာတဲ့ နည္းေလးကို အသံုးျပဳလိုရေအာင္ျပန္လည္ share လိုက္တယ္။
စလိုက္ၾကရေအာင္ေနာ္;
1. ပထမဆံုးအေနႏွင့္ DASHBOARD >> NEW POST >> EDIT PAGES ကိုသြားလိုက္ပါ
2. NEW PAGE တစ္ခု ျပဳလုပ္လိုက္ပါ။
3. Page ရဲ႕ title ကိုေတာ့ (ဥပမာ) FORUM (သို႔မဟုတ္) ေဖာ္ရမ္ လို႔ေပးလိုက္ေပါ့ဒ
4. စာမ်က္ႏွာ အသစ္မွာ ဘာမွ (ဘာ post မွ မေရးပဲ ) Publish လုပ္လိုက္ပါ။ ရလာတဲ့ စာမ်က္ႏွာ အသစ္ ဖြင္လိုက္ပါ။
5. browser ထဲမွာ မိမိ၏စာမ်က္ႏွာ အသစ္ရဲ့ လိပ္စာကို copy ယူျပီး notepad နဲ႔ မွတ္ထားပါ
ဥပမာ (http://yourdomain.blogspot.com /p/forum.htm)
6. ဒီဆိုဒ္ေလးကို သြားလိုက္ပါ
7. လိုအပ္တာေတြ ျဖည့္ျပီး အေကာင့္ တစ္ခု ဖြင့္လိုက္ပါ. သင့္အီးေမးလ္ verify လုပ္ျပီး အေကာင့္ကို active ျဖစ္ေအာင္ လုပ္ပါ
verify လုပ္ရန္ သင့္အီးေမးလ္ မွာ inbox က အေပၚက ကိုယ္အေကာင့္ဖြင့္ခဲ့တဲ့ ဆိုဒ္ mail ကိုဖြင့္ျပီး သူညႊန္ၾကားခ်က္အတိုင္း
လုပ္သြားလိုက္ပါ။ သင့္ အေကာင္ အက္တစ္ ျဖစ္သြားပါပီ.
8. သင့္ ေဖာ္ရမ္းေလးဟာ မိမိ ေကာင့္ဖြင့္လိုက္တဲ့ <a href="http://n4.nabble.com/free-forum.html">ဆိုဒ္</a>မွာ
ဖြင့္ျပီးသြားပါျပီ။
9. မိမိ ေဖာ္ရမ္ရဲ႕ embed code ကို ယူရပါမယ္. embed code ကို ယူရန္ OPTIONS >> EMBEDDING OPTIONS
ကိုႏိႈက္ျပီး code ကို ေတြ ရမွာ ျဖစ္ပါတယ္။
10. embed code copy ယူပါ။
11. ျပီးရင္ မိမိ ဘေလာ့ရဲ႕ DASHBOARD >> DESIGN >>EDIT HTML ျပန္သြားလိုက္ပါ။
12. ေအာက္မွာ ေပးထားတဲ့ ကုဒ္ကို( ကီးဘုတ္မွ CTRL+F အကူျဖင့္ အလြယ္တကူ) ရွာပါ။
<div id='content-wrapper'>
13. ေတြျပီဆိုရင္ ေအာက္မွာေပးထားတဲ့ ကုဒ္ေလးကို အေပၚမွာ ထည့္လို္က္ပါ ။
<b:if cond='data:blog.url == "ဒီေနရာမွာ မိမိ ဘေလာ့၏ url ကိုထည့္ပါ">
ဒီေနရာမွာ ေဖာ္ရမ္က copy ယူထားတဲ့ embed code ကိုထည့္ပါ
</b:if>
14.အေပၚက ကုဒ္ေနရာမွာ (ဒီေနရာမွာ မိမိ ဘေလာ့၏ url ကိုထည့္ပါ)နဲ႔(ဒီေနရာမွာ ေဖာ္ရမ္က copy ယူထားတဲ့ embed code
ကိုထည့္ပါ) ဆိုတဲ့ေနရာေလးေတြမွာ မိမိ copy ယူထားထာေလးေတြ ကို သူေနရာႏွင့္သူ ထည့္ေပးပါ။
15. ေနာက္ျပီး ေအာက္က ကုဒ္ေလးထပ္ရွာပါ။
</head>
16.ေတြ႔ျပီဆိုရင္ ေအာက္မွာေပးထားတဲ့ ကုဒ္ေလးကို အေပၚမွာ ထည့္လိုက္ပါ
<b:if cond='data:blog.url == "မိမိ ေဖာ္ရမ္ မွ URL ကိုထည့္ပါ"'>
<style type='text/css'>
#content-wrapper {
display:none !important;
}
</style>
</b:if>
17. preview ႏွင့္ၾကည့္လိုက္ပါ error မတတ္ရင္ အိုေက သြားျပီေပါ့
18.မိမိ ရဲ႕ TEMPLATE ေလးကိုsave လိုက္ပါ ။ မိမိရဲ႕ ဘေလာ့ေလးမွာ ေဖာ္ရမ္ ေလး ရသြားပါျပီ။
scroce; http://www.techblaster.net/2011/08/how-to-make-forum-for-blogger-blog.html
လင့္အေပၚမွာ ေရာင္စံု ကာလာေလး ထည့္နည္း
လင့္ အေပၚမွာ mouse နဲ႔ေထာက္လိုက္ရင္ မာတီကာေလးေတြ ေျပးေနေအာင္ လုပ္နည္းေလးပါ။
- Layout > Edit HTML ကိုသြားလိုက္ပါ
- </head> ကုဒ္ကိုရွာပါ ။
- </head> ကို ေတြ႔ျပီဆိုရင္ အေပၚမွာ ေအာက္ကကုဒ္ေလးကို ထည့္လိုက္ပါ
<script type='text/javascript'>
//<![CDATA[
var rate = 20;
if (document.getElementById)
window.onerror=new Function("return true")
var objActive; // The object which event occured in
var act = 0; // Flag during the action
var elmH = 0; // Hue
var elmS = 128; // Saturation
var elmV = 255; // Value
var clrOrg; // A color before the change
var TimerID; // Timer ID
if (document.all) {
document.onmouseover = doRainbowAnchor;
document.onmouseout = stopRainbowAnchor;
}
else if (document.getElementById) {
document.captureEvents(Event.MOUSEOVER | Event.MOUSEOUT);
document.onmouseover = Mozilla_doRainbowAnchor;
document.onmouseout = Mozilla_stopRainbowAnchor;
}
function doRainbow(obj)
{
if (act == 0) {
act = 1;
if (obj)
objActive = obj;
else
objActive = event.srcElement;
clrOrg = objActive.style.color;
TimerID = setInterval("ChangeColor()",100);
}
}
function stopRainbow()
{
if (act) {
objActive.style.color = clrOrg;
clearInterval(TimerID);
act = 0;
}
}
function doRainbowAnchor()
{
if (act == 0) {
var obj = event.srcElement;
while (obj.tagName != 'A' && obj.tagName != 'BODY') {
obj = obj.parentElement;
if (obj.tagName == 'A' || obj.tagName == 'BODY')
break;
}
if (obj.tagName == 'A' && obj.href != '') {
objActive = obj;
act = 1;
clrOrg = objActive.style.color;
TimerID = setInterval("ChangeColor()",100);
}
}
}
function stopRainbowAnchor()
{
if (act) {
if (objActive.tagName == 'A') {
objActive.style.color = clrOrg;
clearInterval(TimerID);
act = 0;
}
}
}
function Mozilla_doRainbowAnchor(e)
{
if (act == 0) {
obj = e.target;
while (obj.nodeName != 'A' && obj.nodeName != 'BODY') {
obj = obj.parentNode;
if (obj.nodeName == 'A' || obj.nodeName == 'BODY')
break;
}
if (obj.nodeName == 'A' && obj.href != '') {
objActive = obj;
act = 1;
clrOrg = obj.style.color;
TimerID = setInterval("ChangeColor()",100);
}
}
}
function Mozilla_stopRainbowAnchor(e)
{
if (act) {
if (objActive.nodeName == 'A') {
objActive.style.color = clrOrg;
clearInterval(TimerID);
act = 0;
}
}
}
function ChangeColor()
{
objActive.style.color = makeColor();
}
function makeColor()
{
// Don't you think Color Gamut to look like Rainbow?
// HSVtoRGB
if (elmS == 0) {
elmR = elmV; elmG = elmV; elmB = elmV;
}
else {
t1 = elmV;
t2 = (255 - elmS) * elmV / 255;
t3 = elmH % 60;
t3 = (t1 - t2) * t3 / 60;
if (elmH < 60) {
elmR = t1; elmB = t2; elmG = t2 + t3;
}
else if (elmH < 120) {
elmG = t1; elmB = t2; elmR = t1 - t3;
}
else if (elmH < 180) {
elmG = t1; elmR = t2; elmB = t2 + t3;
}
else if (elmH < 240) {
elmB = t1; elmR = t2; elmG = t1 - t3;
}
else if (elmH < 300) {
elmB = t1; elmG = t2; elmR = t2 + t3;
}
else if (elmH < 360) {
elmR = t1; elmG = t2; elmB = t1 - t3;
}
else {
elmR = 0; elmG = 0; elmB = 0;
}
}
elmR = Math.floor(elmR).toString(16);
elmG = Math.floor(elmG).toString(16);
elmB = Math.floor(elmB).toString(16);
if (elmR.length == 1) elmR = "0" + elmR;
if (elmG.length == 1) elmG = "0" + elmG;
if (elmB.length == 1) elmB = "0" + elmB;
elmH = elmH + rate;
if (elmH >= 360)
elmH = 0;
return '#' + elmR + elmG + elmB;
}
//]]>
</script>
 Admin@@@ေမာင္ေအးလြင္
 ကိုယ္ ေလ့လာလို႔ သိတာေလးေတြကို မသိေသးေတြ အတြက္ျပန္လည္ မွ်ေ၀တာပါ
သင္ယူူေလ့လာေနသူကေတာ့ မသင္သူထက္ေတာ့ တတ္မွာပါ....ဟုတ္ဘူးလား :D
မိမိဘေလာ့မွာ ေကာမန္႔ "Reply link" ေလးထည့္နည္းေလးပါ
- ပထမဆံုး Blogger > Design > Edit HTMLကိုသြားလိုက္ပါ။
- ဘေလာ့ template ေလးကို Backup လုပ္ထားပါ
- "Expand widgets Templates" Box ကို Click ပါ။
- ဒီကုဒ္ေလးကိုရွာပါ ]]></b:skin>
- ေတြ႔ျပီဆိုရင္ ေအာက္မွာေပးထားတဲ့ ကုဒ္ေလးကို အေပၚမွာထည့္လိုက္ပါ။
/*--------------MBT Reply Link --------------*/
.MBT-replycomments{
background:#ECEAEA;
cursor:pointer;
color:#fff;
margin:5px 0;
float:right;
border:none;
padding:4px;
-moz-border-radius:6px;
-webkit-border-radius:6px;
border-radius:6px;
font:10px sans-serif;
}
.MBT-replycomments:hover{
background:#E7E7E7;
}
- မူလအေနအထားအေရာင္ကိုကိုယ္ၾကိဳက္တဲ့ အေရာင္နဲ႔ေျပာင္းႏိုင္ပါတယ္ #ECEAEA
- ေမာက္စ္နဲ႔ေထာက္လိုက္ရင္ေျပာင္းသြးမယ္အေရာင္ေလးပါ မိမိစိတ္ၾကိဳက္ေျပာင္ႏိုင္ပါတယ္#E7E7E7
- အေရာင္ကုဒ္ကိုဒီေနရာမွာ ရယူႏိုင္ပါတယ္ Color Generator
<dd class='comment-footer'>မေတြဘူးဆိုရင္ ဒီကုး္ေလးကိုရွာပါ,
class='comment-footer'ေတြ႔ျပီဆိုရင္ေအာက္ေပးထားတဲ့ "Reply Link" Code ကိုအေပၚမွာထည့္လိုက္ပါ
<div class='MBT-replycomments'><a expr:href='"https://www.blogger.com/comment.g?blogID=*******************&postID=" + data:post.id + "&isPopup=true&postBody=%40%3C%61%20%68%72%65%66%3D%22%23" + data:comment.anchorName + "%22%3E" + data:comment.author + "%3C%2F%61%3E#form"' onclick='javascript:window.open(this.href, "bloggerPopup", "toolbar=0,location=0,statusbar=1,menubar=0,scrollbars=yes,width=650,height=650"); return false;'>Reply..</a></div>
- Reply..ဆိုတဲ့စာသားကို မိမိ ၾကိဳက္သလိုေျပာင္းလိုက္ပါ။
- ******************* ဒီေနရာေလးမွာမိမိရဲ႔ဘေလာအိုင္ဒီ BLOG ID ကိုထည့္ပါ။
- မိမိရဲ႕ ဘေလာအိုင္ဒီကို http://www.blogger.com/ မွာ logged in ၀င္လိုက္ပါ။
- ျပီးရင္ မိမိဘေလာ့မွာ Desing ကိုႏႈိက္လိုက္ browser address bar မွာ ဂဏန္း 18-19 လံုးရွိပါတယ္ အဲဒီ နံပါတ္ေတြကို ေကာ္ပီယူျပီး စတားပြင့္ေလးေတြေနရာမွာ paste လုပ္လိုက္ပါ ေအာက္မွာ ပံုေလးေလးျပထားပါတယ္ အားလံုး ျပီးသြားေတာ့ preview နဲ႔အရင္ၾကည့္လိုပ္ပါ error မတတ္ဘူးဆိုရင္ေတာ့ save လိုက္ပါ အဆင္ေျပပါေစ
 Admin@@@ေမာင္ေအးလြင္
 ကိုယ္ ေလ့လာလို႔ သိတာေလးေတြကို မသိေသးေတြ အတြက္ျပန္လည္ မွ်ေ၀တာပါ
သင္ယူူေလ့လာေနသူကေတာ့ မသင္သူထက္ေတာ့ တတ္မွာပါ....ဟုတ္ဘူးလား :D
မိမိဘေလာ့မွာ Author Info Box ေလးထည့္မယ္
1။ ပထမဆံုးအေနႏွင့္ Blogger > Design > Edit HTML သြားလိုက္ပါ။
2။ မိမိ၏ဘေလာ့ (template )ေလးကို မွားသြားရင္ျပန္ျပီးမူရင္းအတိုင္းျပန္ယူလို႔ ရေအာင္လို႔ရေအာင္ Back up လုပ္ထားပါ။
3။ ]]></b:skin> ဆိုတဲ့ ကုဒ္ေလးကိုရွာပါ။
4။ ရွာေတြ႔ရင္ေအာက္မွာေပးထားတဲ့ ကုဒ္ေလးကို အေပၚမွာထည့္လိုက္ပါ။
/*----------Guest Poster --------*/
.mbt-gp img {
margin:0;
border:0;
}
.mbt-gp-about {
font-size:12px;
margin:0 auto;
padding:3px;
width:580px;
background:#edf6ff;
border:#9ecfff dotted 1px;
min-height:130px;
}
.mbt-gp {
padding-top:10px;
margin:0;
font-size:12px;
float:left;
width:17%;
text-align:center;
border-right:#93C0F9 solid 1px;
}
.mbt-gp-text {
float:right;
width: 80%;
padding:5px;
text-align:left;
font:12px arial,sans-serif;
text-align:justify;
margin:0;
padding:0;
}
preview နဲ႔ အရင္ၾကည့္လိုက္ပါ error မတက္ရင္ေတာ့ save လိုက္ပါ။
ေနာက္ျပီး ဒုတိယ အဆင့္အေနနဲ႔ ေအာက္မွာေပးထားတဲ့
<div class="mbt-gp-about">ဲ့ ကုဒ္ေလးကို notepad ေလးနဲ႔ အျမဲသံုးလိုရေအာင္
<div class="mbt-gp"><img src="ဒီမွာ မိမိဓါတ္ပံု link ကိုထည့္ပါ" width="80" height="70" /> ေရးမည့္အေၾကာင္းအရာ ထည့္ရန္ </div>
<div class="mbt-gp-text">
<p><strong>About the Guest Author:</strong>
<br />ေရးမည့္အေၾကာင္းအရာ ထည့္ရန္ </p>
</div>
</div>
သိမ္းထားလိုက္ပါ။ မိမိ post တင္ခ်ိန္တြင္ post အေၾကာင္းအရာ အားလံုးေရးလို႔ ျပီးစီးသည္အခါ
HTML ဆိုတာေလးကိုႏႈိက္ပါ။ ေအာက္ဆံုးတြင္ notepad နဲ႔ သိမ္းထားတဲ့ ကုဒ္ေလးကိုထည့္လိုက္ပါ။
ေအာက္မွာ screen shoot ေလးပါ တင္ေပးထားပါတယ္.............။

ရပါျပီး မိမိ ေရးသားထားေသာ post ေလးကို ျပန္ၾကည့္လိုပါ.......GOOD LUCK!!!!!!
scroce: http://www.mybloggertricks.com/2011/04/show-guest-author-info-below-blogger.html
Admin@@@@@ေမာင္ေအးလြင္ မတတ္တာအျပစ္မဟုတ္ပါ...မသင္တာအျပစ္ပါ:
က်ေနာ္မတတ္ပါ က်ေနာ္ဟာ........................
သင္ယူေလ့လာေနသူတစ္ဦးပါ...ဟိဟိ..လိပ္မ်ိဳး
Random Template
Trending Template


Popular Template
Recent Post

This is featured post 1 title
Lorem ipsum dolor sit amet, consectetur adipisicing elit, sed do eiusmod tempor incididunt ut labore et dolore magna aliqua. Ut enim ad minim veniam, quis nostrud exercitation test link ullamco laboris nisi ut aliquip ex ea commodo consequat.

This is featured post 2 title
Lorem ipsum dolor sit amet, consectetur adipisicing elit, sed do eiusmod tempor incididunt ut labore et dolore magna aliqua. Ut enim ad minim veniam, quis nostrud exercitation test link ullamco laboris nisi ut aliquip ex ea commodo consequat.

This is featured post 3 title
Lorem ipsum dolor sit amet, consectetur adipisicing elit, sed do eiusmod tempor incididunt ut labore et dolore magna aliqua. Ut enim ad minim veniam, quis nostrud exercitation test link ullamco laboris nisi ut aliquip ex ea commodo consequat.

This is featured post 4 title
Lorem ipsum dolor sit amet, consectetur adipisicing elit, sed do eiusmod tempor incididunt ut labore et dolore magna aliqua. Ut enim ad minim veniam, quis nostrud exercitation test link ullamco laboris nisi ut aliquip ex ea commodo consequat.

This is featured post 5 title
Lorem ipsum dolor sit amet, consectetur adipisicing elit, sed do eiusmod tempor incididunt ut labore et dolore magna aliqua. Ut enim ad minim veniam, quis nostrud exercitation test link ullamco laboris nisi ut aliquip ex ea commodo consequat.
Popular Posts
-
 ပညာေရး၀န္ႀကီးဌာန၊ ျမန္မာစာအဖဲြ႕က ႀကိဳးႀကိဳးစားစား ျပဳစုထားတဲ့ ့ျမန္မာအဘိဓါန္ေလးပါ.... သံုးခ်င္တယ္ဆိုရင္ေတာ့ ဒီမွာေဒါင္း လိုင္က္ပါ...ေဖာင့္က...
 -
 Online အတြက္က ဒီမွာ ၁ Online အတြက္က ဒီမွာ ၂ ကြန္ပ်ဴတာ အတြက္ ေဆာ့၀ဲလ္ ကိုေတာ့ မီဒီယာဖိုင္းယားေဒါင္း ပါ ကြန္ပ်ဴတာ အတြက္ ေဆာ့၀ဲလ္ ကိုေတာ့ အို...
 -
Antamedia Hotspot 1.64 Antamedia HotSpot Billing Software is Windows PC gateway software which enables control and charging for In...
-
ျမန္မာ့ရိုးရာဓေလ့၊ သေဘာသဘာဝ၊ အရည္အေသြး၊ အႏုပညာႏွင့္ ဗဟုသုတမ်ား၊ အထူးသျဖင့္ ျမန္မာတို႔၏ အစဥ္အလာ ဂုဏ္သိကၡာမ်ားကို ေလ့လာ၊ အတုယူ၊ ထိန္းသိမ္းႏိ...
-
ဒီေဆာ့၀ဲေလးကေတာ့ ဗီဒီယို တည္းျဖတ္မွာ အေကာင္းဆံုးစာရင္း(TOP 10) ထဲမွာ ပါတဲ့ ေဆာ့၀ဲျဖစ္ပါတယ္ ကီးဂ်င္ ေလးရွာေတြ လို႔ သူငယ္ခ်င္းေတြ သံုး ႏ...
-
 မိမိ ဘေလာ့မွာ ကိုေရးထာတဲ့(post တင္တဲ့)စာေတြကို သိသိသာသာ သတိထားမိေစရန္ ဒီလိုေလးေရခ်င္ရင္ေတာ့ ေအာက္မွာေဖာ္ျပထားတဲ့ အတိုင္း လုပ္ၾကည့္ပါ အား...
 -
 KMD က ကုိျမတ္ခုိင္ ျပဳလုပ္ထားတဲ့ ျမန္မာလက္ကြက္ ေလ့က်င့္တဲ့ ေဆာ့၀ဲလ္ေလးပါ။ ကြန္ပ်ဴတာ ျမန္မာလက္ကြက္ ေလ့က်င့္ေနတဲ့ သူမ်ားအတြက္ ေဖာ္ျပေပးလိုက္...
 -
အေပၚမွာ ပံုေလးတင္ျပထားပါတယ္ ...:P ဘာမွမဟုတ္ေပမယ့္ က်ေနာ္လို ၀ါသနာအရ ဘေလာ့ ေရးေနတဲ့ သူငယ္ခ်င္းေတြ အတြက္ တစ္ခါတစ္ေလ ကိုယ္ေရးတဲ့ post...
-
 ႔ ေနာက္ဆံုးထြက္ ဗားရွင္းေလးမို႔ သူငယ္ခ်င္းေတြကို ျပန္လည္ မွ်ေ၀လိုက္ပါတယ္ ဒီေဆာ့၀ဲလ္ကိုေတာ့ အားလံုးသိျပီးသားျဖစ္မွာ မို႔ ေထြေထြ ထူးထူး ...
 -
 ဒီေကာင္ေလးက Screen locker ဆိုတဲ့အတိုင္း screen ကို ေလာ့ခ်ေပးတဲ့ ေဆာ့၀ဲလ္ေလးပါ... ကိုယ္ပိုင္စက္ အသံုးၿပဳေနတဲ့ လူေတြအတြက္ အသံုး၀င္ပါတယ္....


